Many of our customers requested the ability to send email from custom domain instead of the default GetSign domain. The reason is simple: emails sent from a trusted company domain look more professional, improve brand consistency, and are less likely to be flagged as spam.
By introducing custom domain email sending, GetSign now ensures your document requests and signature invitations feel like a seamless extension of your organization’s communication—no more confusion about who the email is coming from.
Step by step guide to send email from custom domain:
With this new feature, setting up your custom domain takes just a few minutes. Here’s how:
Step 1: Add Your Root Domain
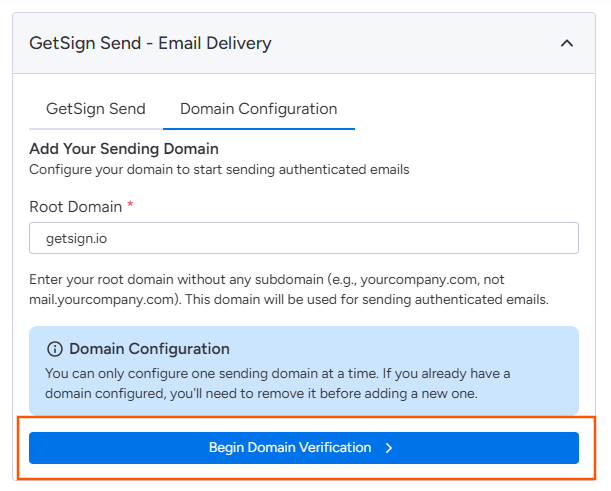
Go to GetSign Send → Domain Configuration in your GetSign settings. Enter your root domain (e.g., yourcompany.com) and click Begin Domain Verification.

Step 2: Add DNS Records
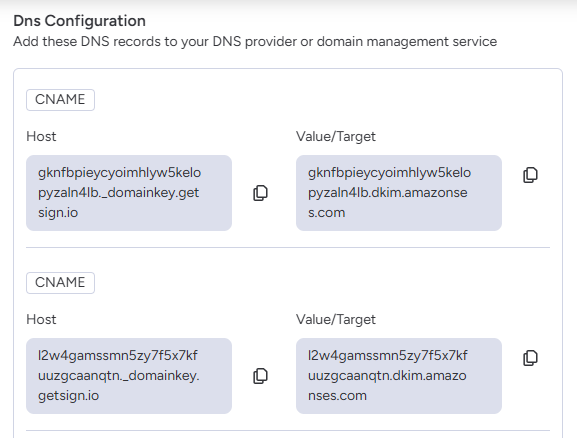
GetSign will provide you with a set of CNAME records. Copy these and add them to your DNS provider or hosting panel (like cPanel).

These records verify:
- DKIM Authentication (for secure email delivery)
- Custom Mail From (so emails show your domain)
Not sure how to do that? Use the guides below for popular providers. If your provider isn’t listed, the process is very similar—look for settings called DNS, DNS Records, Zone Editor, Advanced DNS, or Domains. If you still can’t find it, contact your provider’s support team and share the exact records from this page.
Provider guides (most recent official docs):
- GoDaddy: Manage DNS records (step-by-step) — godaddy.com/help/manage-dns-records. GoDaddy
- Namecheap: How do I set up host records for a domain? (updated Apr 14, 2025). Namecheap
- cPanel (many web hosts use this): Zone Editor (add/edit DNS records; doc last modified Jul 14, 2025). cPanel & WHM Documentation
- Cloudflare: Create and manage DNS records (dashboard walkthrough). Cloudflare Docs
- Squarespace Domains: Adding DNS records to your domain (updated June 17, 2025). support.squarespace.com+1
- Wix: Managing DNS records in your Wix account. Wix Support+1
- Bluehost: DNS management guide (adding/editing records). Bluehost
- AWS Route 53: Creating records using the console. AWS Documentation
- Google Cloud DNS: Add, update, and delete records (console & CLI quickstarts; refreshed weekly). Google Cloud+1
- DigitalOcean DNS: Create, edit, and delete DNS records (control panel & API). DigitalOcean Docs
What to do next
- Open your DNS provider’s guide above.
- Add each record exactly as shown in the GetSigned setup (type, host/name, value, and TTL if specified).
- Save changes. DNS can take up to 24–48 hours to propagate globally, but it’s often much faster. (Propagation notes are also mentioned in several provider docs.) support.squarespace.com
If you manage DNS somewhere else, search that provider’s help center for “add DNS record” or “manage DNS”, or contact their support with the records from this page.
Step 3: Confirm and Verify
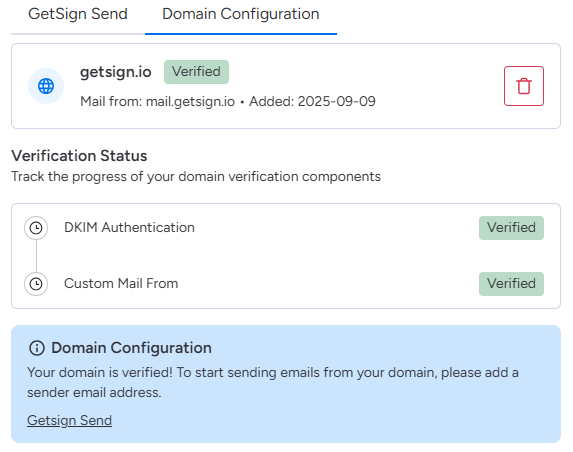
Once the DNS records are added, go back to GetSign and check Confirm you have added these records.
Click Verify.

If everything is set correctly, you’ll see green checkmarks showing that your domain is verified.

Step 4: Add a Sender Email
After verification, open GetSign Send and add your Sender Name and Sender Email.
Your domain (e.g., @getsign.io) will already be listed—just enter your username (e.g., hello@getsign.io). Note: The emails will be sent from

You can also set the Email Language for outgoing emails.
You’re all set
From now on, all emails sent through GetSign will come from your custom domain instead of the default GetSign domain.
This helps build trust with your recipients, ensures better deliverability, and keeps your document workflows on monday.com fully branded.


