Moving your data from spreadsheets into a collaborative Work OS like monday.com unlocks automation, real-time collaboration, and better visibility across teams. Whether you’re bringing in tasks, sales leads, or subitems, this guide will walk you through the Excel import process step-by-step and show how to optimize your imported data for use with GetSign.
Why import Excel data into monday.com?
Migrating from static spreadsheets to monday.com helps teams:
- Collaborate in real time: Everyone has access to the latest updates
- Automate repetitive tasks: Trigger reminders, status changes, and assignments
- Gain insights: Build dashboards and reports that reflect project health, sales pipelines, or operations at a glance
If you’re still relying on Excel to manage critical workflows, it’s time to centralize your data and elevate your productivity.
If you’re ready to leave behind static spreadsheets, read on to learn how to seamlessly bring your Excel data—subitems, connected columns, and all—into your monday.com boards.
Steps on how to import list from Excel:
So, your team has embraced the shift to monday.com, but there’s still some vital data lingering on Excel. Lets work on import list from Excel:
Step 1: Prepare Your Excel File
Before you start importing, ensure your spreadsheet is ready. Remove duplicates, confirm consistent column headers, and decide which columns will become subitems or connected fields. Save your file as .xlsx or .csv.
Step 2: Initiate the Import Process

1. Open the existing monday.com board where you want to import data.
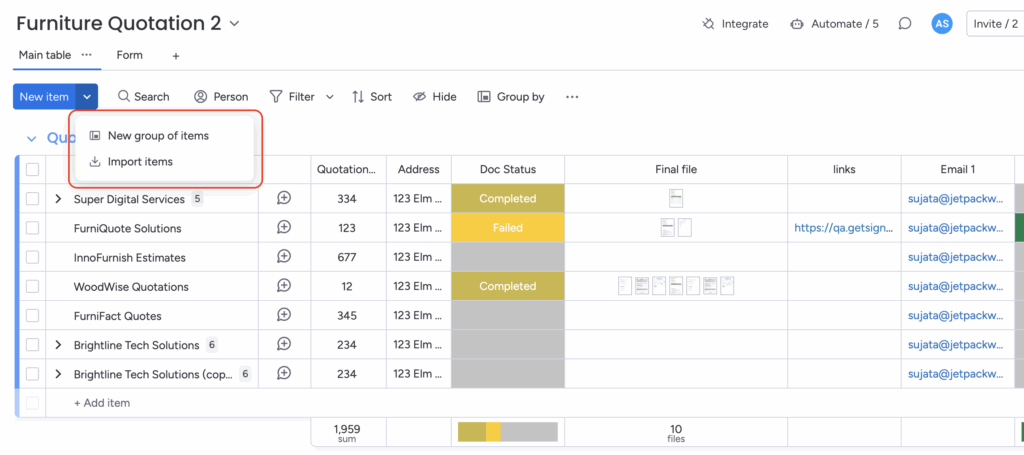
2. Click the arrow next to the “New Item” button at the top of the board.
3. Select “Import Items” from the dropdown menu.
Step 3: Map Excel Columns to monday.com Columns

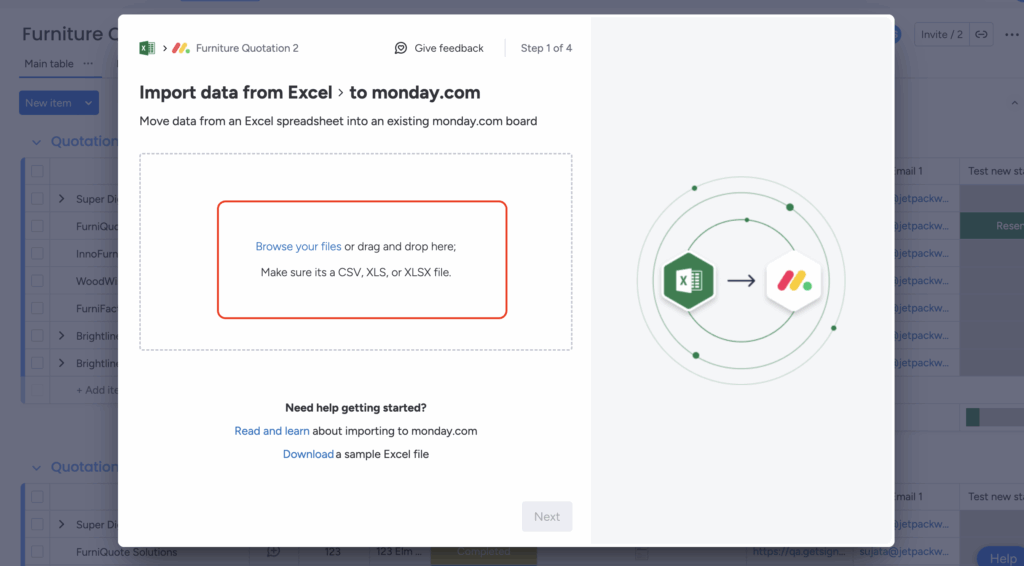
1. Upload Your File: Drag or browse for your Excel/CSV file in the pop-up window.
2. Assign Item Name: Choose which Excel column represents the main “Item Name” in monday.com.
3. Match Additional Fields: For each column (e.g., “Email,” “Date,” “Status”), select the corresponding monday.com column type. Unmapped columns won’t be imported.
Optional: Leverage GetSign for document workflows
Once your Excel data is imported, use GetSign to automate document workflows based on that data.
Step 4: Connect GetSign to your imported data
- Ensure GetSign is installed on your board
- Open an imported item
- Click the GetSign tab
- Map board fields (like Email, Status, or Item Name) into your document template
- Send the document for signature using a secure link
Status updates and signature history sync directly to your board
Benefits of using GetSign after importing Excel data
- Generate documents: Create contracts, quotes, and invoices using imported board values
- Automate eSignature workflows: Trigger document sends based on status updates
- Track progress in real time: Know who signed, who’s pending, and what’s complete
- Collect data via fillable forms: Use columns as form fields for seamless client data capture
Use cases: When to import Excel into monday.com
1. Team onboarding
Migrate employee records, task checklists, or internal policies into one centralized board.
2. Sales & CRM
Turn a spreadsheet of leads into a CRM pipeline, complete with automations for follow-up emails and status tracking.
3. Inventory & operations
Import supplier info, product SKUs, and stock levels, then manage inventory live on monday.com.
4. Project management
Convert Excel-based timelines, milestones, and task lists into fully interactive boards with subitems and deadlines.
Conclusion:
Importing your data from Excel into monday.com helps teams move faster, collaborate smarter, and eliminate manual busywork. When paired with GetSign, that same data becomes the foundation for automated, legally binding document workflows.
Centralize your work. Automate your signatures. Eliminate the spreadsheet chaos.


